ちょっと機会があって、PHPを触っております。
イベント予約フォームの自動返信がしたい
今現在、とある依頼があり、この処理の実装を行おうとしているところであります。自動返信を実現するには、いくつか選択肢があると思いますが、どうしようか悩んでおりました。ホスティングしているレンタルサーバーの制限などもあるので、それを加味しつつなるべく安く、、、
方法1. Googleフォーム + GASでやる
一番お手軽なのですが、GmailApp.sendEmailが1日に100回しか呼び出せないため却下(100回以上送るかもしれないので)
方法2. WordPressのプラグインとか使う
ネット上にいろんな情報がありすぎて、どれを信じていいかわからず、挫折
方法3. 素のバッチ処理を書いて、どっかのSMTPサーバーをぶっ叩く
自作フォームで、POSTと同時にどっかのSMTPサーバーを叩く。サーバーサイドのプログラミングですね。
一番シンプルで、不透明な部分も少ないので、この方法で実装することにしました。(100回という制限が無ければ、即GASなのですが、、、)
できればホスティングしている場所と同じところにプログラムを置きたいので、現在レンタルしているサーバーの都合上でPHPにすることにしました。Gmailだと認証も面倒なので、レンタルサーバーのSMTPサーバーを拝借することに。
PHPでメールを送る
PHPでメールを送るのにも、色々方法があるのですね。調べてみただけ、まとめてみました。
mb_send_mail()
一番お手軽そうですが、今回は認証が必要なので使ってません。使い方は他サイトでたくさんでてきます。
Qdmail
PHPでメール送信する方法としては結構メジャーそうですが、更新がだいぶなされておらず。そもそもダウンロードページからzipがダウンロードできなくて断念。
PHPMailer
やっとタイトルの文言がでてきましたね。今回はこのPHPMailerを使いました。Wordpressとかでも、裏ではこのライブラリを使っているようですね。
さて、本題のPHPMailerでのメール送信方法
やっとPHPMailerでのメール送信の方法なのですが、結論から言うとサンプルコード一発でした。
しかしながら、タイトルにもあるように、5.2系と6.0系では、ディレクトリ構造やファイル名が異なるので、メール送信のお作法がだいぶ変わってきます。ですが、現状でのネットの情報は5.2系のものが多く、非常につまづきました。(公式のREADMEをちゃんと読めという話ではございますが、、、)これからPHPMailerを使う方は、バージョンに注意した方がいいと思われます。
PHPMailerのダウンロード
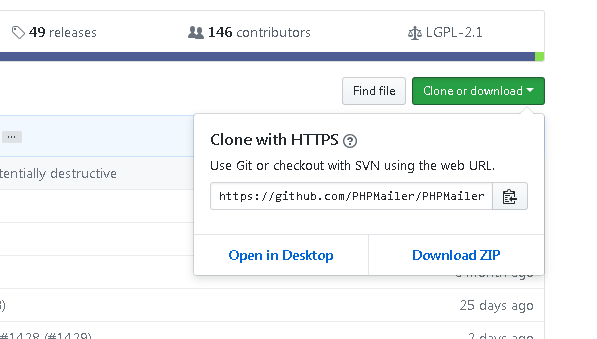
まずは公式のページからPHPMailerをダウンロードしましょう。
https://github.com/PHPMailer/PHPMailer
以下図のように、git cloneやzipをダウンロードした場合は6.0系のPHPMailerが手に入ります。(2018年4月29日現在)

ダウンロードしたPHPMailerは、フォルダごとホスティングしているサーバーに突っ込みましょう。
サンプルコードの前に、5.2系との違い
5.2系と大きく違うところは、
require 'PHPMailerAutoload.php';
とか
require 'class.phpmailer.php';
require 'class.smtp.php';
とかでライブラリをインポートしていたと思いますが、6.0系からは以下のコードとなります。
【6.0系】Composerを使っている場合use PHPMailer\PHPMailer\PHPMailer; use PHPMailer\PHPMailer\Exception; //Load Composer's autoloader require 'vendor/autoload.php';
【6.0系】Composerを使っていない場合use PHPMailer\PHPMailer\PHPMailer; use PHPMailer\PHPMailer\Exception; // PHPMailerを配置するパスを自身の環境に合わせて修正 require 'path/to/PHPMailer/src/Exception.php'; require 'path/to/PHPMailer/src/PHPMailer.php'; require 'path/to/PHPMailer/src/SMTP.php';
サンプルコード
以下にサンプルコードを示します。
※以下のコードは6.0系です
<?php
use PHPMailer\PHPMailer\PHPMailer;
use PHPMailer\PHPMailer\Exception;

// PHPMailerを配置するパスを自身の環境に合わせて修正
require 'path/to/PHPMailer/src/Exception.php';
require 'path/to/PHPMailer/src/PHPMailer.php';
require 'path/to/PHPMailer/src/SMTP.php';

$mail = new PHPMailer(true);                              // Passing `true` enables exceptions
try {
    //Server settings
    $mail->SMTPDebug = 2;                                 // Enable verbose debug output
    $mail->isSMTP();                                      // Set mailer to use SMTP
    $mail->Host = 'smtp1.example.com;smtp2.example.com';  // Specify main and backup SMTP servers
    $mail->SMTPAuth = true;                               // Enable SMTP authentication
    $mail->Username = 'user@example.com';                 // SMTP username
    $mail->Password = 'secret';                           // SMTP password
    $mail->SMTPSecure = 'tls';                            // Enable TLS encryption, `ssl` also accepted
    $mail->Port = 587;                                    // TCP port to connect to (ssl:465)

    //Recipients
    $mail->setFrom('from@example.com', 'Mailer');
    $mail->addAddress('joe@example.net', 'Joe User');     // Add a recipient
    $mail->addAddress('ellen@example.com');               // Name is optional
    $mail->addReplyTo('info@example.com', 'Information');
    $mail->addCC('cc@example.com');
    $mail->addBCC('bcc@example.com');

    //Attachments
    $mail->addAttachment('/var/tmp/file.tar.gz');         // Add attachments
    $mail->addAttachment('/tmp/image.jpg', 'new.jpg');    // Optional name

    //Content
    $mail->isHTML(true);                                  // Set email format to HTML
    $mail->Subject = 'Here is the subject';
    $mail->Body    = 'This is the HTML message body <b>in bold!</b>';
    $mail->AltBody = 'This is the body in plain text for non-HTML mail clients';

    $mail->send();
    echo 'Message has been sent';
} catch (Exception $e) {
    echo 'Message could not be sent. Mailer Error: ', $mail->ErrorInfo;
}
?>
まとめ
ということで、慣れないPHPを触ってみたのでその備忘録でした。


